Quick Start
Info
This quick start guide assumes you have RoomHub hardware ready. If you are looking for how to prepare the hardware - look into hardware section.
Quick start guide shows how to connect relay module and configure RoomHub to control it. Connecting other types of devices is similar and can be done with the similar steps.
What do you need
- Assembled Aetas RoomHub 3 with 5v power supply cable
- PlatformIO installed (if your RoomHub doesn't have firmware installed)
- WiFi network
- Mobile phone (Android or iOS)
- Running MQTT broker (e.g. Mosquitto)
- MQTT client installed on your computer (e.g. MQTT.js)
- Ethernet cable (with connector on one side only)
- relay module
Connect and configure device
Warning
Make sure RoomHub is never connected to power supply and USB port at the same time. This will destroy the device and may damage your computer.
- Install RoomHub firmware (see instruction).
- Connect RoomHub to power supply (make sure it is not connected to USB).
-
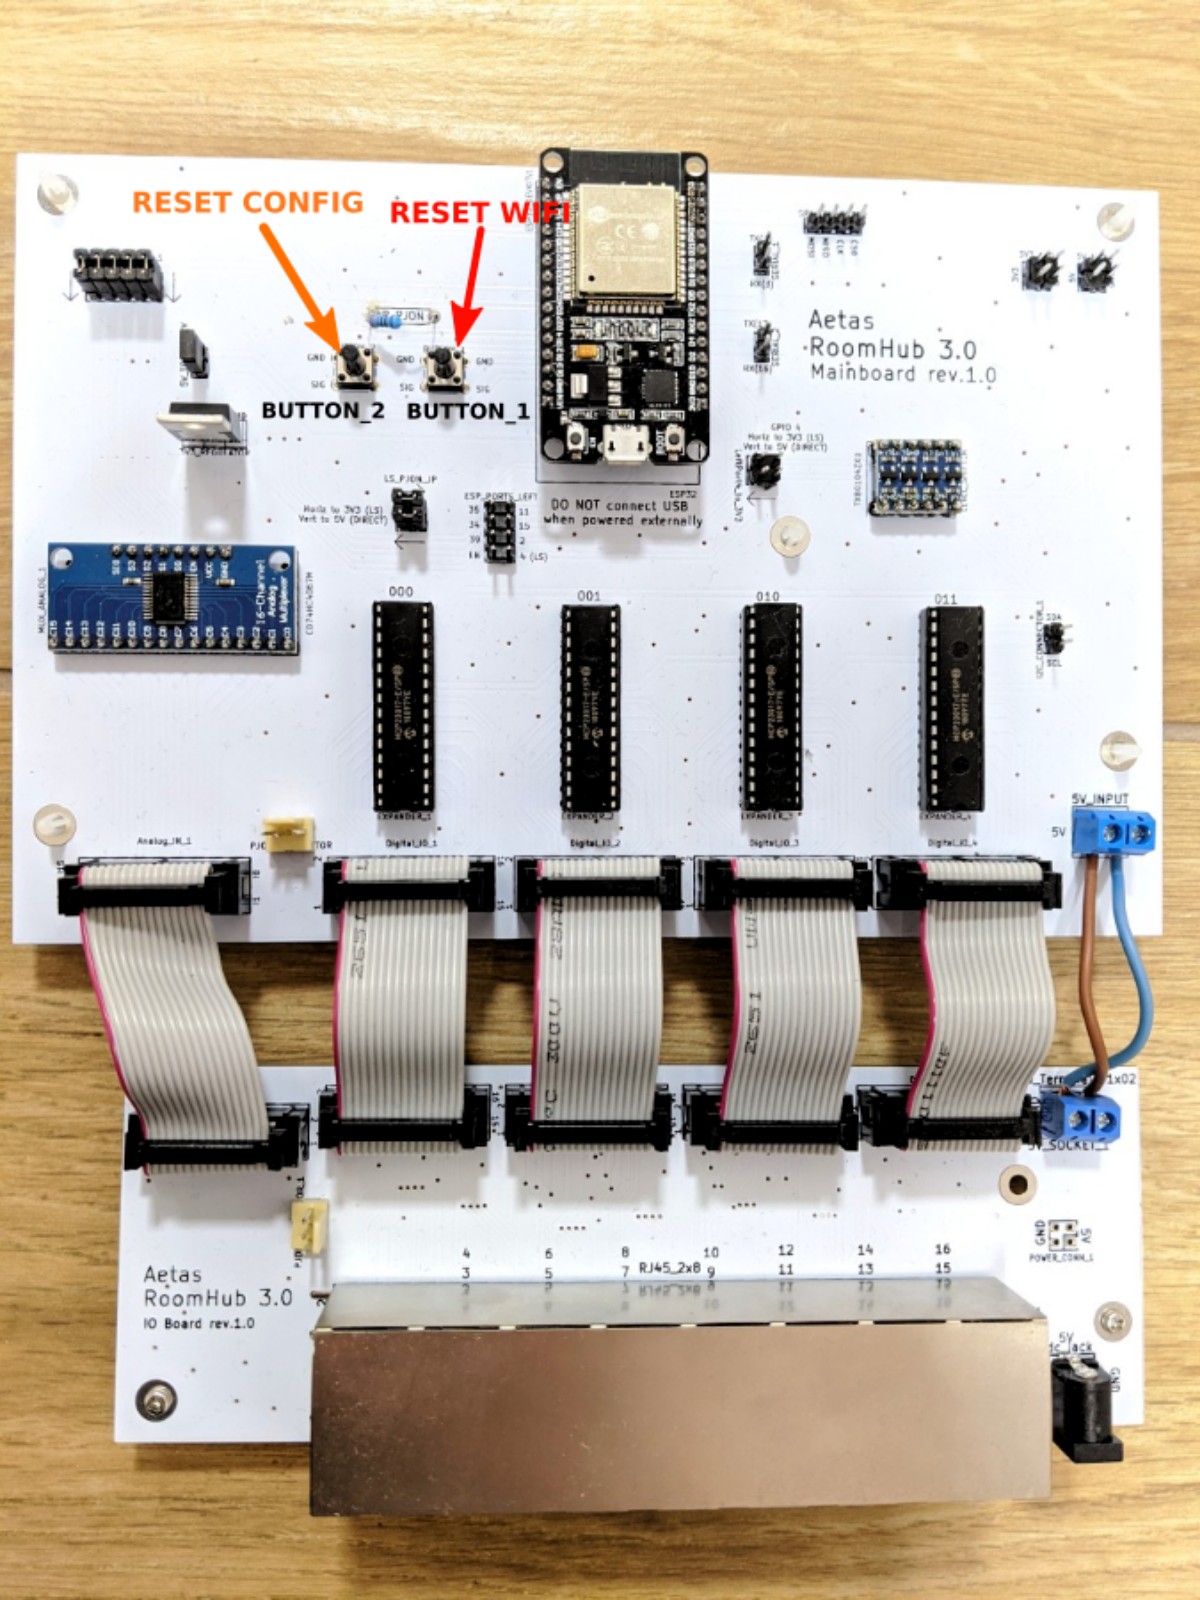
Keep button 1 pressed on RoomHub and restart it by pressing "EN" button on ESP32.
Keep button 1 pressed until blue LED will blink 3 times (around 5 seconds).
-
Use EspTouch to connect RoomHub to your WiFi network (Google Play or Apple Store) - more
- Connect your phone to the WiFi network you want RoomHub to be connected to
- Put your WiFi password in the EspTouch application
- Press "Confirm" in the app
- After around 30 seconds you should get success message with IP address of RoomHub - store this IP address for later
-
Prepare ethernet cable with connector on one side (according to standard T568B)

-
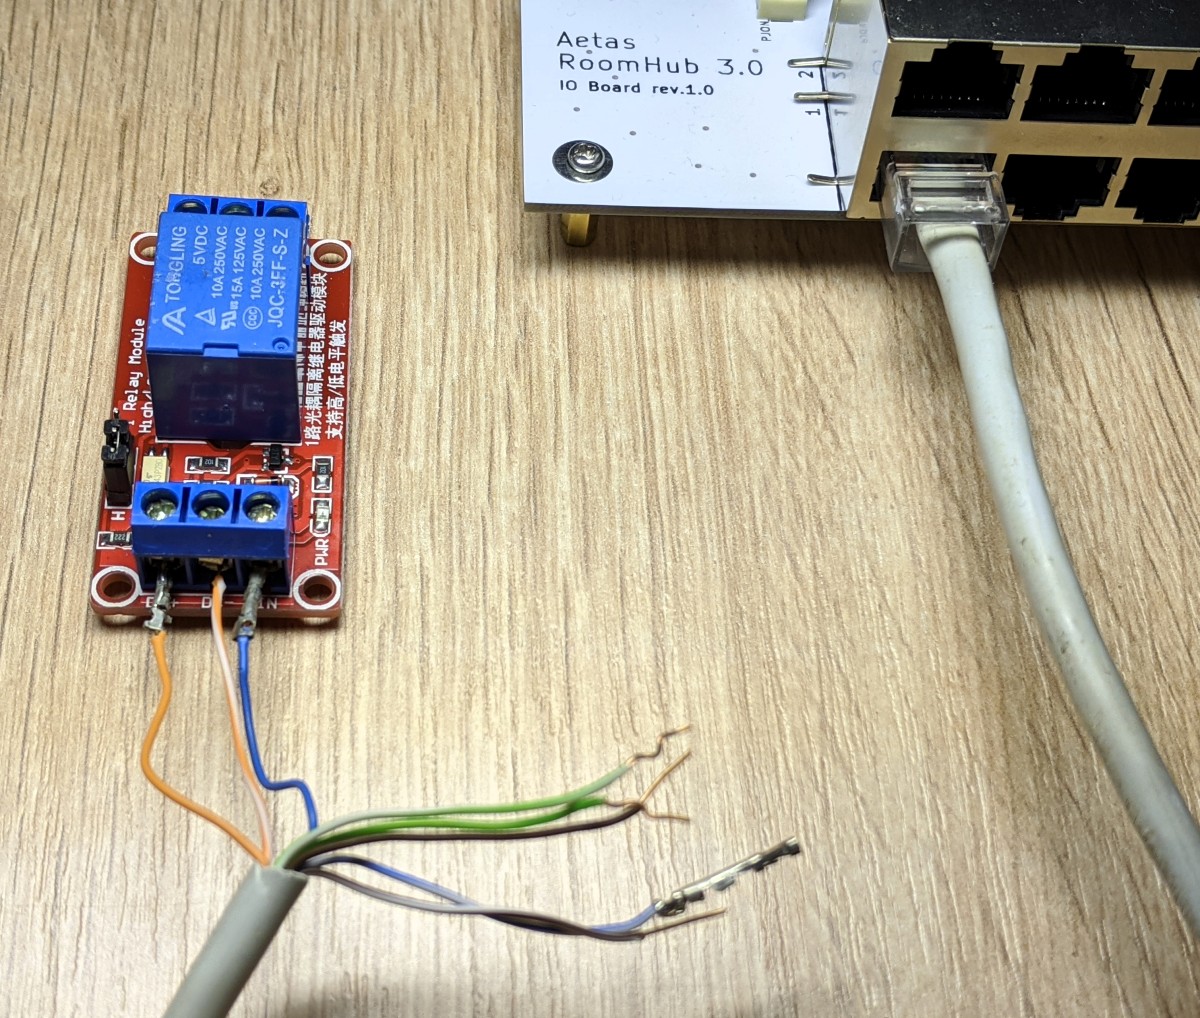
Connect relay module to ethernet cable (photo)
module pin wire color VCC/DC+ orange ground/DC- orange-white control/IN blue -
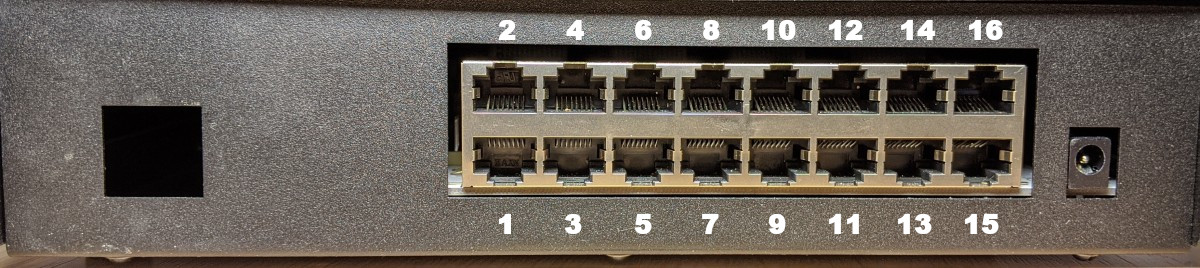
Connect module to RoomHub port 1 (ports)
-
Prepare configuration file
test.roomhub.yml- look into comments to find out which value to change
configVersion: "3.0"
name: "TestRoomHub"
destinationIpAddress: "192.168.1.66" # set IP of RoomHub (see point 4.d.)
mqttHostname: "192.168.1.52" # set IP of your MQTT broker
network: # only for Ethernet - leave as it is for WiFi connection
  macAddress: "6D:CB:54:AD:E9:93"
  ipAddress: "0.0.0.0"
rooms:
  - name: "workshop"
    points:
      - name: "point with test relay"
        portNumber: 1
        devices:
          - name: "test relay"
            id: 1
            wires: ["BLUE"]
            type: RELAY
For more details on configuration files see configuration page. -
Apply configuration with configurator
- Download latest version of RoomHub Configurator for Linux, MacOS or Windows
- Extract archive
-
Run Configurator CLI with command (make sure path to
test.roomhub.ymlis correct)bin/room-hub-configurator /home/john/test.roomhub.ymlbin/room-hub-configurator /Users/john/test.roomhub.ymlbin\room-hub-configurator.bat C:/test.roomhub.yml
Sample output
____ __ __ __ / __ \____ ____ ____ ___ / / / /_ __/ /_ / /_/ / __ \/ __ \/ __ `__ \/ /_/ / / / / __ \ / _, _/ /_/ / /_/ / / / / / / __ / /_/ / /_/ / /_/ |_|\____/\____/_/ /_/ /_/_/ /_/\__,_/_.___/ Starting RoomHubConfiguratorApplicationKt on desktop with PID 22499 (started by user in /home/john/room-hub-configurator-0.1.0-alpha.20-linux/room-hub-configurator-linux) No active profile set, falling back to default profiles: default Devtools property defaults active! Set 'spring.devtools.add-properties' to 'false' to disable LiveReload server is running on port 35729 Started RoomHubConfiguratorApplicationKt in 1.26 seconds (JVM running for 1.663) JSON schema validation succeeded ✔ Application validation succeeded ✔ Setting RoomHub name to 'TestRoomHub' Sending network configuration '6D:CB:54:AD:E9:93;0.0.0.0;;;;' Setting MQTT hostname to '10.0.88.100' Sending device configuration '1.0;1;test relay;2;1;4;0;0' Finalizing RoomHub configuration RoomHub configured correctly -
Subscribe to MQTT topic to see device has been initialized (replace IP address with your MQTT broker address)
mqtt sub -t 'homie/TestRoomHub/#' -h '192.168.1.52' -vSample output
homie/TestRoomHub/$homie 3.0.1 homie/TestRoomHub/$name TestRoomHub homie/TestRoomHub/$nodes 1 homie/TestRoomHub/$implementation Aetas homie/TestRoomHub/$fw/name Aetas RoomHub homie/TestRoomHub/$fw/version 3.1.0-dev.13-WIFI homie/TestRoomHub/$localip 10.0.88.82 homie/TestRoomHub/$mac 3C:71:BF:59:34:34 homie/TestRoomHub/$stats uptime,signal,freeheap homie/TestRoomHub/$stats/interval 30 homie/TestRoomHub/$stats/uptime 1198 homie/TestRoomHub/$stats/signal 88 homie/TestRoomHub/$stats/freeheap 248064 homie/TestRoomHub/$state ready homie/TestRoomHub/1/$name test relay homie/TestRoomHub/1/$type DigitalOutput homie/TestRoomHub/1/$properties state homie/TestRoomHub/1/state/$name state homie/TestRoomHub/1/state/$settable true homie/TestRoomHub/1/state/$retained true homie/TestRoomHub/1/state/$datatype enum homie/TestRoomHub/1/state/$format ON,OFF -
Send MQTT message to switch relay state (replace IP address with your MQTT broker address)
mqtt pub -t 'homie/TestRoomHub/1/state/set' -h '192.168.1.52' -m 'ON'
State of the relay should change.
Congratulation! You have just configured your first device on RoomHub.